


Here’s what you will need:
- Sewing machine
- Upholstery fabric
- Good quality cotton (I used Gutermann)
- Piping cord (if you want to add piping)
- Zip
- Good quality pins

Making the piping
I made my window seat cushion cover with piping, but you can skip this step to make the project easier. This is not an essential element but gives the cushion a professional finish.
To make the piping, you need to cut a strip of the upholstery fabric 4cm (seam allowance x 2) wide + an allowance for the cord. The easy way to do this is simply wrap the cord in the fabric and mark where to cut. Depending on the material you use, you may prefer to cut on the bias. I didn’t find it to be a problem cutting straight with this fabric.
It doesn’t matter if you don’t have one continuous piece of piping as you won’t notice the seams once joined together. Leave an extra piece of cord sticking out to help with joining piping together.

Cutting material for the panels
You will need a top and bottom panel which are identical. A long panel for the front and two sides. The back panel is a bit more complicated due to the zip, so I’ll deal with that one separately.
I cut my top and bottom panels at the same time, by folding the fabric over, pinning it, marking the dimensions, and using a rotary cutter.
Add a seam allowance of 2cm when cutting your panels. This means you add a border of 2cm around the whole edge of your panels. This is where you will sew them together.
Also keep in mind that if your cushion has been wrapped in batting, it will be bigger. I would therefore suggest adding 0.5 to 1cm to the length, depth and width of your cushion to account for the batting and avoid your cushion cover being too tight.
It’s a good idea to pin your panels in place onto the cushion before sewing anything to check it all fits as expected. I used a pencil to draw the seams onto the inside of each panel. This makes it easier to follow when sewing them together.
As everything is sewn together with the outside facing in, marking the seams like this makes it really easy to follow with the sewing machine.

Zip Panel
You don’t have to add a zip. There are easier options, for example you could use Velcro. You could also sew the back panel by hand up once the cushion insert is in, but this means you can’t remove the cover to wash.
The zip panel wasn’t too tricky. You need to cut two strips of fabric (as opposed to one like we did for the front panel). The seam allowance is required around each of the two pieces. So, if your strip needs to be 8cm wide, you will need two strips of 8cm each. That’s 8cm divided by 2 = 4cm + 2cm seam allowance all around = 8cm.
I found it easiest to tack the two panels together using a contrasting thread (makes it easier to identify and remove later). Then fold out the seams and tack the zip into place.
I’ve used big stitches to hold my two pieces of fabric together (outside facing in) along the seam line. Now you can see the seams of the two panels have been folded over (you could iron them flat) and then the zip tacked in place. Make sure the zip is facing the right way for use.
Using the zipper foot on the sewing machine, sew your zip into place and remove the thread for tacking.
For a tidy finish, add a small panel of fabric to each end of the zip, before attaching piping, as illustrated below. Just fold the end of the fabric over and sew all the way down the panel end (including over the zip).

Attach the piping
If you have decided to use piping, this needs to be attached along the top and bottom seams of the front, 2 x side and zip panels. You can skip this step remember. Adding piping means a lot of layers of fabric and sewing through them all can be tricky. However attaching the piping itself is easy as you just line the edges up and use the zipper foot to sew along the seam line as below. The cord can be sewn in close using the zipper foot.
At this point, it’s a good idea to double check everything still fits together as expected by pinning all the pieces to your foam window seat cushion insert.

Attach the top and bottom panels
Next, the top and bottom panels need to be attached along the seam line. I did everything inside out and then turned it in the right way. I did find this tricky, as there is a lot of material by now, especially if you’ve used piping. Using a needle for quilting helps. I find using the machine manually, by turning the dial to move the needle up and down, over the thickest areas was necessary in places.
I’ll be honest, I did have to unpick my panels here! I’d sewn the cushion cover too tight, and it was a bad fit as a result the first time. This is why I suggest pinning your pieces together over the cushion first to check everything fits as you expect it to. But if it is your first time having a go, like it was for me, be ready for a bit of trial and error. It doesn’t matter if you need to unpick bits – mistakes are how we learn after all.

Joining panels together
Panels are sewn together along the seam allowance as usual, but to keep things neat, flatten out your seams as illustrated below.

Joining piping together
To join piping together, simply tuck the end of one piece into the fabric of the piece you are joining it to and snip away the excess cord. Fold the fabric back down and sew along the seam line.
You will need to unpick the stitches on one side to tuck the cord. Once the cord is tucked in, snip away the excess so it meets the end of the other piece of cord. Fold the fabric back over and stitch together closely using the zipper foot.

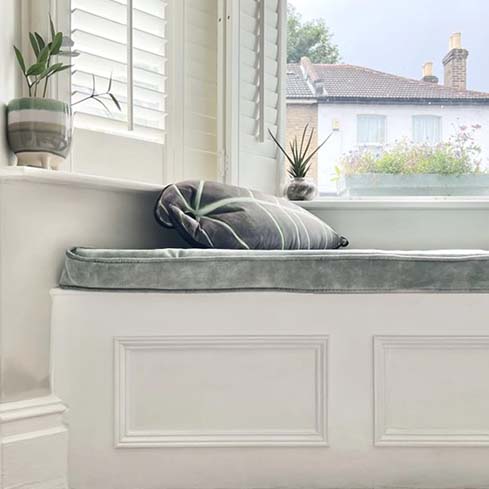
The finished result
And that’s it! Pop your cushion cover on, zip it up and admire your handiwork. Happy sewing!
By Melissa Ritchie, blogger at Little Terraced House.